

Okay so today I am about to show you how you find your way around Pixlr Editor. You'll want to use this rather than Pixlr Express because the editing tools are much better. Okay, so here we go!
When you click on the website, the page will show you a list of options. The top option should be to 'Create a new image'. Click on this. A new small window will pop up asking for the size of your photo. Enter '256' for the width, and '400' for the height. Do not change anything else, simply click 'OK'.
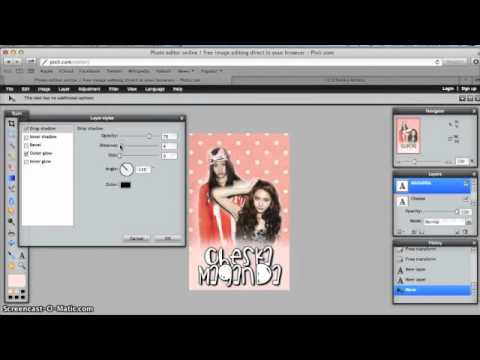
Your cover space/box should now pop up and you should see a tool bar on the side, as well as options such as File, Edit, Image, Layer, etc. on the top of the page.
Click the 'Layer' option, go down, and select the 'Open Image as Layer' option. BEFORE YOU DO THIS MAKE SURE YOUR IMAGE IS THE CORRECT SIZE. This is the one thing I use Pixlr Express for. It's easy to re-size your image, simply go to the 'Adjustment' tab and re-size your image after loading it. Save your image, and then upload it to Pixlr Editor.
Now, I am going to give you an overview of the necessary tools on the website.
Crop Tool: For this tool, click it, (it looks like a box with a line through it) and select the area you want cropped. Then you can click 'OK' to apply the changes. This also may be easier for you to do on Pixlr Express.
Move Tool:It looks like an arrow with a mini compass underneath it. Click it, and with this you can move your images around.
Lasso Tool: (It looks like a rope) Press 'Shift' and then click on the area you want to erase on your picture. It may select the outline of a person, which makes it easy to remove the background, or it may cut out some of what you want. If this is the case, undo what you erased and use the eraser tool.
Eraser Tool: (looks like an eraser...duh) Simply click on this tool and then erase the part of your picture that you want to erase. You can change the size of your eraser in the top bar.
____________________
Now, to add an image on top of the image you selected first, you can go to the 'layers' tab at the top again and select the 'add image as layer' option again. Using the 'move' tool you can position it the way you want, and using the 'eraser' tool you can erase the background.
Now that you know the basics, I suggest you take some time and play around with the website! There's so much to discover and by playing around you can find out for yourself what tools work best for you.
I've attached a video to the chapter (I didn't make it though) so that if explaining the website in words was confusing. a visual may be able to help you.
Well that's all for now! I hope this was helpful and if you have questions please comment below!

YOU ARE READING
How To Make Amazing Wattpad Covers
Teen FictionSo you want to learn how to make amazing covers? This book will teach you everything you need to know! I can guarantee that after you have used the tips from this book, you will get compliments on your covers. From the basics of sizing and finding t...
